Filters and Saved Filters
Why Filters?
Time is fleeting, and we can never seem to find enough of it. Playvox gets it! You need to see the results that matter, fast! That’s why Customer AI allows you to use filters on the following pages:
- Dashboards
- Topics Page (general page as well as specific Topics)
- Topic Groups Page (general page as well as specific Topic Groups)
- Search Page
Look for the Add Filter button at the top left of these pages.

How do Filters Work in Customer AI?
Filters help you get to the heart of your data quickly. They rely on Metadata from your synced integrations, so the process is as smooth and seamless as a catamaran cutting through calm waters. Here’s how it works.
- Click on Add Filter on any of the above mentioned pages.
- A list of filters will appear based on your connected integration settings. These filters will be broken into two groups: Conversation Attributes and User Attributes.
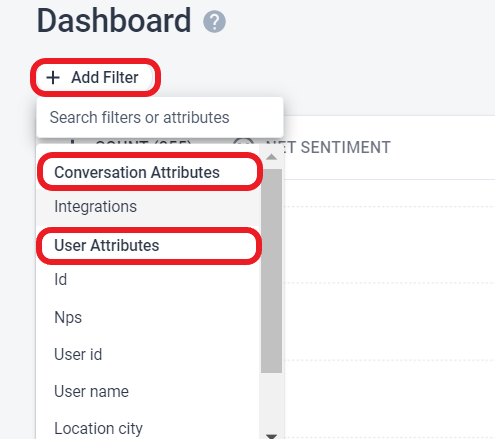
Conversation Attributes can be thought of as ticket-level attributes. They are directly related to your integration instance settings. Example: If you’ve set up the Zendesk integration, you may filter any Customer AI reports by Brand ID, Ticket Form ID, or the Satisfaction Rating.
User Attributes cover a broader range of metadata including things like ID, NPS, Location Country, and Tags.
| Note: Filter lists will depend on the data within your connected integrations as well as which fields have been mapped for each integration. Please contact support@prodsight.com if you’d like to request additional attributes to be mapped into your integrations. | ||
3. Select your desired filter to make your rule (Example: Integrations + Contains + Intercom).


4. Click Apply and relish in your filtered reports!

5. You may add another filter by clicking Add Filter. Add as many filters as makes sense for your task at hand.

Saved Filters
You’ve found a great set of filters to give you the specific results you’re looking for. Customer AI lets you save those filters which gives back more of that precious time we talked about earlier. Hoorah!
- Follow the same process mentioned above to set your filters.
- Then, simply click the save icon next to your filter list.

A popup will appear prompting you to name your filter.
Tip: Make sure the name is something that explicitly describes the filter you’re saving for easier reference.

3. Click Save when complete.
4. You’ll be able to view and use your Saved Filter by clicking the Add Filter button.

5. To delete a saved filter, click on the 3 dots to the right of the desired filter.

6. Then Click Delete, and Confirm.


A couple more quick facts about filters
- Filters stay active as you navigate through the platform.
- You may remove filters at any time by clicking the X next to the Save Filter icon.

- Once a filter is removed, it will aggregate data on all pages.
- Search for filters by using the search bar at the top of the filter list.

That’s all for now! Happy filtering. May it save you time and give you the energy you need to focus on the important things, like your incredible customers!